Your cart is currently empty!
Category: Technology
-

Uncovering a Password Stealing Facebook Support Scareware Scam
Subscribe to 22halomedia YouTube Channel
Introduction
Scams are on the rise and everyone seems to experience at least one phishing attempt a day. At this point, to most, scams are kind of like ads where they just blur into the background.
Not only are we experiencing an influx of scams but they are getting more advanced and more difficult to detect.
Today I was sent a pretty realistic scam in Facebook messenger. The scammer was posing as support trying to scare me into giving up my password.
This kind of scam is called Scareware because its supposed to scare you into making a bad decision. Like giving up your password to a hacker!
Uncovering the Scam
Imagine the following:
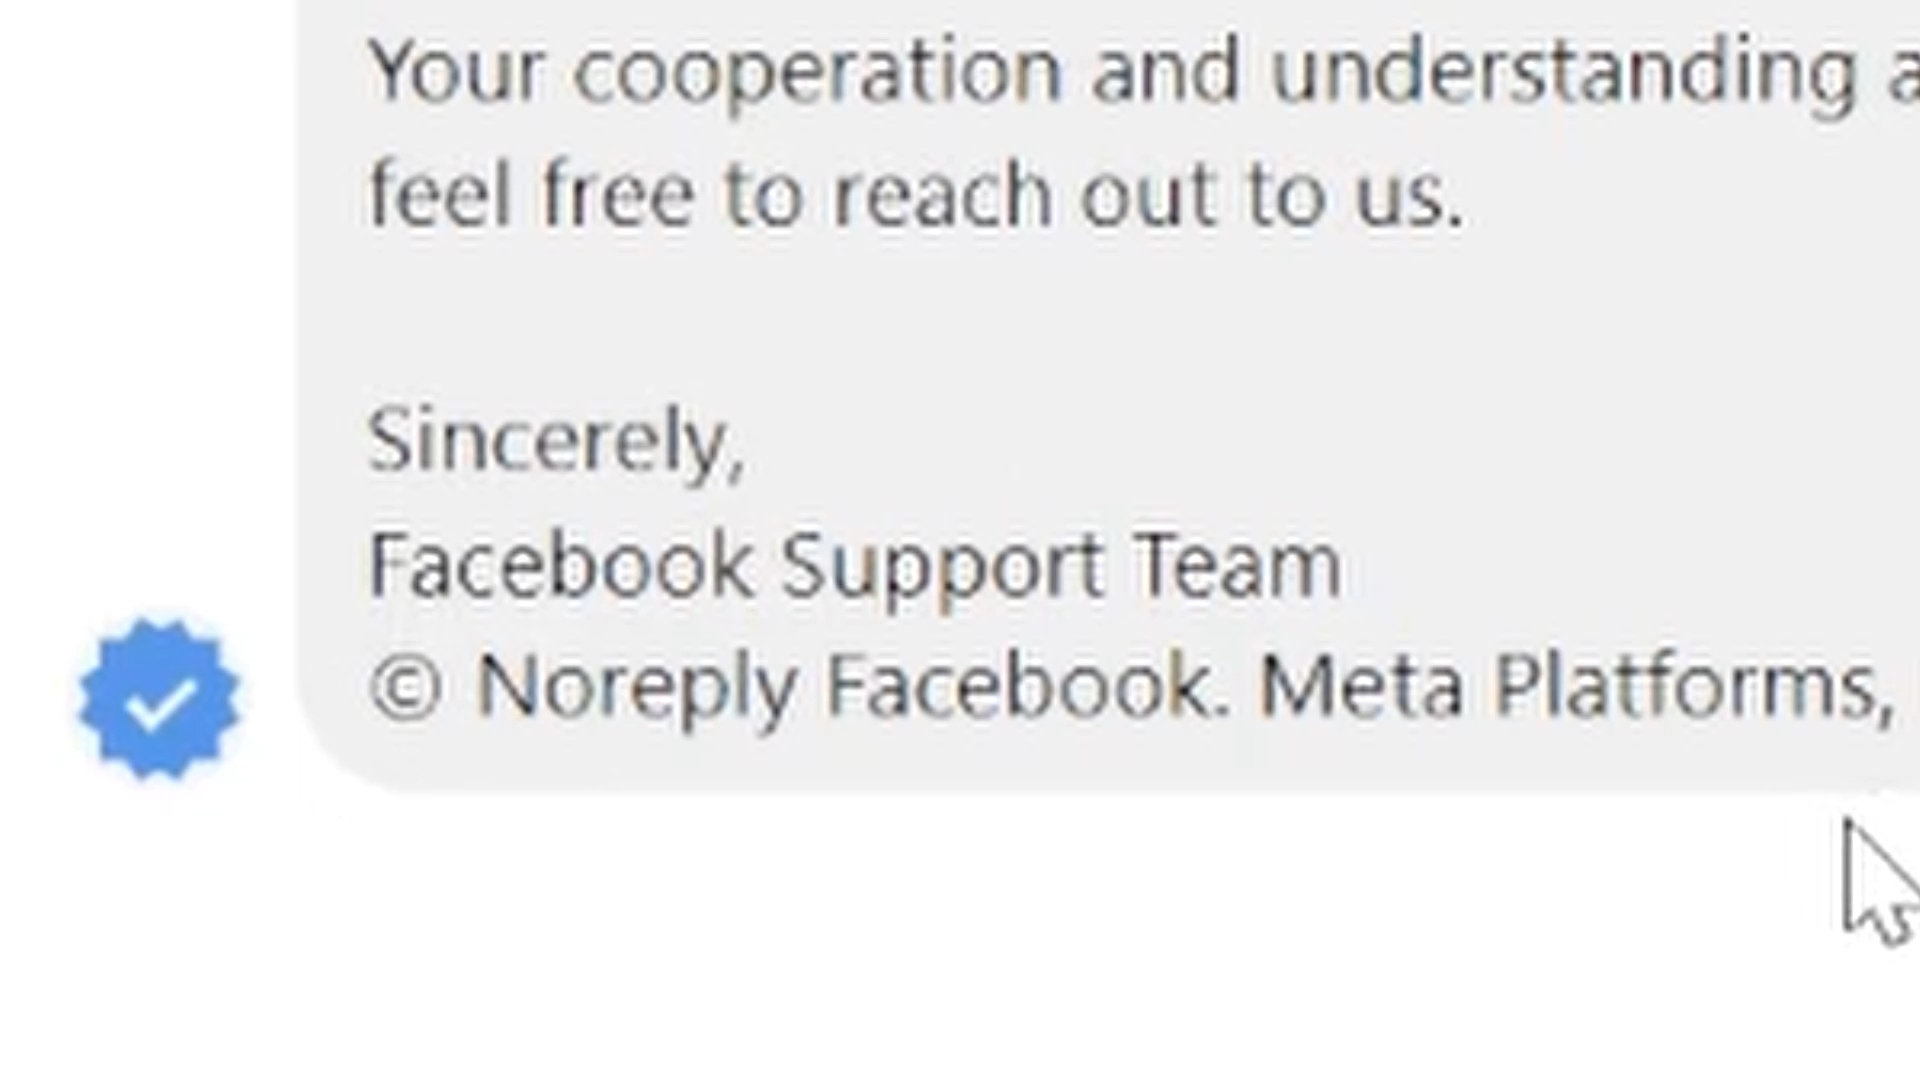
You’re a marketing intern browsing through your company’s Facebook page when bam! You’re hit with this message:

What do you do? Most would simply ignore the message or send it to spam. But it may be so obvious to everyone.
I mean it’s definitely Facebook right? It’s even verified. See? Blue checkmark!

Whether you’re the gullible type, stressed out, or situationally vulnerable, you go against your best judgement or simply follow your ill-informed instinct and decide to click the following:

Then the following page loads:

Ah, a support page. Yes this is familiar. It even has Meta’s branding! Time to click ‘Request of Review’ to submit a ticket. I don’t want my Facebook page to be canceled!
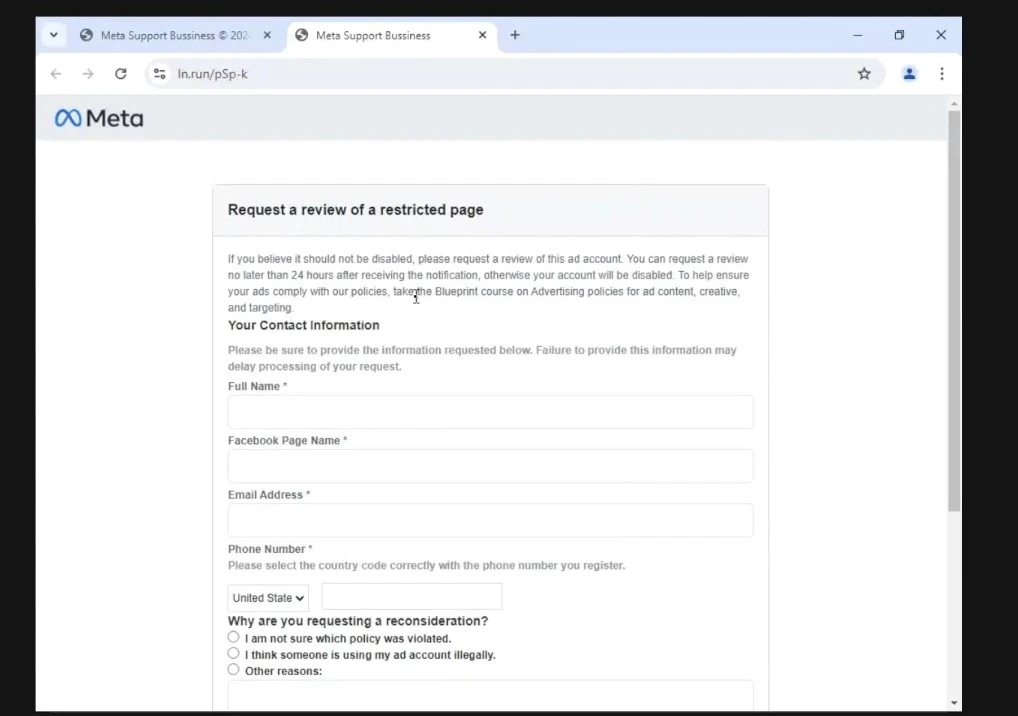
Ok, time to fill out the form and submit my ticket!! Full name, Facebook page, email address, phone number and a message. Seems standard to me.
The following password prompt appears once you click Send:
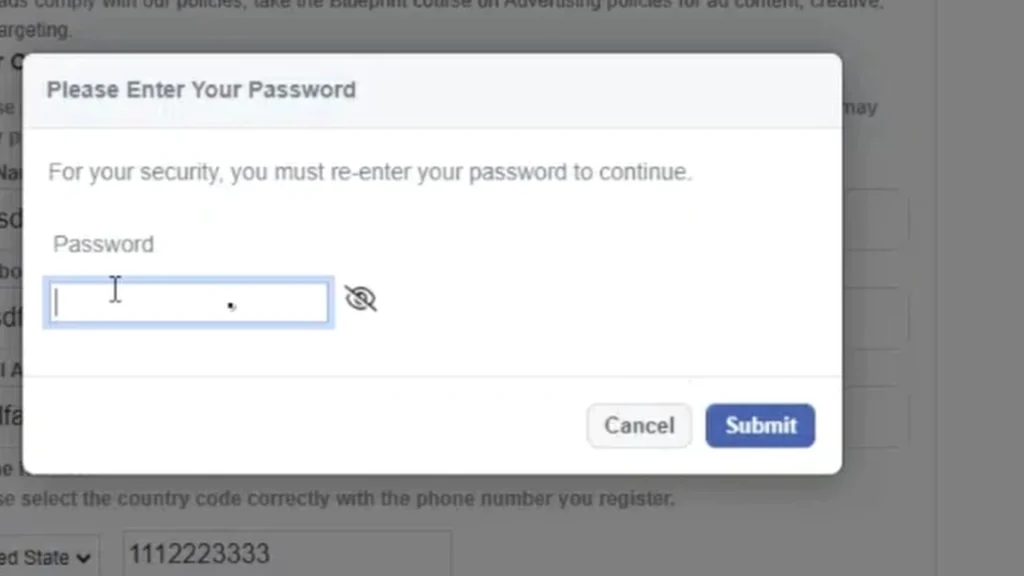
…and without thinking twice, you enter your password before pressing submit to your unknown demise. You’ve been SCAMMED! Your password is stolen.
At this point your only hope is that Multi-Factor Authentication (MFA) is turned on. If it’s not… your Facebook account will soon be hacked.
Conclusion
Now I know to most this seems like a story that would never come true. I mean come on, look at that URL?!?
But the fact is that people fall for these kind of scams every single day. Plus they keep looking more real. That is why it is increasingly important to stay vigilant and spread awareness around these issues.
If you didn’t know already, October is Cybersecurity awareness month. Check out the Cybersecurity & Infrastructure Security Agency (CISA)’s 4 EASY WAYS to stay online.
Now I want to know… what kind of scams have you been a target of recently?
Comment below!
Articles to Read Next
How to Setup WireGuard VPN on Rocky 9 Linux
Secure Remote Support on LAN with x11vnc over SSH on Rocky Linux
How to Install Virtual Box and Answering “What is a Hypervisor?”
How to Enable Bidirectional Shared Clipboard on VirtualBox VM
How to Create a Linux VM with VirtualBox
Affiliate Links
Form your business with Northwest registered agent
Create a website with namedotcom
Secure your website with Wordfence
Affiliate Disclaimer
Please note that my website and content may contain affiliate links. This means that when you click on these links and make a purchase, I may earn a commission. Rest assured, all the products I promote are ones that I believe to be of high quality, and I personally use them as a consumer myself. Your support through these links helps me continue to create valuable content. Thank you for your support!
-

WP Battle Goes to Court
A Personal Perspective on the WP Engine and Automattic Conflict
First and foremost, I want to clarify that this article reflects my personal opinion and should not be considered professional journalism. That said, we are witnessing a dramatic moment in WordPress history. As someone who considers themselves a bit of a computer and website geek, I feel compelled to share my thoughts on the ongoing conflict between WP Engine and Automattic, particularly involving WordPress co-founder Matt Mullenweg.
Context of the Conflict
While I won’t delve into all the details—I’ll leave that for you to research—this situation is significant. The legal battle could set a precedent for how open-source projects manage trademark licensing and contributions from for-profit companies utilizing their software. My primary hope is that WordPress continues to thrive amidst these power struggles.
Impacts on the Community
As this legal dispute unfolds, it may create opportunities for new players in the WordPress hosting space and potentially reshape how companies contribute to the WordPress core. For instance, the temporary ban on WP Engine’s access to WordPress.org resources has directly affected site updates for their customers, highlighting how these disputes can impact end-users.
The Strength of Community
It’s crucial to remember that WordPress is built on the contributions of many. It remains a vibrant playground for everyone on the web. At the end of the day, the strength of WordPress lies in its diverse community. My hope is this legal battle doesn’t deter individuals from engaging with the platform, but instead brings greater awareness to more transparent and equitable practices within the ecosystem.
Conclusion
While this conflict poses challenges, it also presents an opportunity for growth and evolution within the WordPress community. I encourage everyone involved to remain engaged and optimistic about what lies ahead.
Resources I Used to Form My Opinion
Don’t Forget to do Your Own Research to Form YOUR Opinion.
Articles to Read Next
How to Setup WireGuard VPN on Rocky 9 Linux
Secure Remote Support on LAN with x11vnc over SSH on Rocky Linux
How to Install Virtual Box and Answering “What is a Hypervisor?”
How to Enable Bidirectional Shared Clipboard on VirtualBox VM
How to Create a Linux VM with VirtualBox
Affiliate Links
Form your business with Northwest registered agent
Create a website with namedotcom
Secure your website with Wordfence
Affiliate Disclaimer
Please note that my website and content may contain affiliate links. This means that when you click on these links and make a purchase, I may earn a commission. Rest assured, all the products I promote are ones that I believe to be of high quality, and I personally use them as a consumer myself. Your support through these links helps me continue to create valuable content. Thank you for your support!
-

How to Setup WireGuard VPN on Rocky 9 Linux
Subscribe to 22halomedia YouTube Channel
Read this same article on the Rocky Linux Documentation website
Introduction
WireGuard is a free and open-source peer-to-peer (P2P) Virtual Private Network (VPN). It is a lightweight and secure modern alternative to conventional VPNs with large codebases that rely on TCP connections. Since WireGuard is a P2P VPN, each computer added to the WireGuard network communicates directly with each other. This guide uses a hub-spoke model, with a WireGuard peer assigned a public IP address as a gateway to pass all traffic. This allows WireGuard traffic to bypass Carrier Grade NAT (CGNAT) without enabling port-forwarding on your router. This requires a Rocky Linux system with a public IP address. The easiest way to achieve this is to spin up a virtual private server (VPS) through a cloud provider of your choice. At the time of writing, Google Cloud Platform offers a free tier for its e2-micro instances.
Prerequisites and assumptions
The minimum requirements for this procedure are the following:
- The ability to run commands as the root user or use
sudoto elevate privileges - A Rocky Linux system with a publicly accessible IP address
Installing WireGuard
Install Extra Packages for Enterprise Linux (EPEL):
sudo dnf install epel-release -yUpgrade system packages:
sudo dnf upgrade -yInstall WireGuard:
sudo dnf install wireguard-tools -yConfiguring WireGuard Server
Create a folder to put your WireGuard configuration files and keys:
sudo mkdir -p /etc/wireguardCreate a configuration file with a name of your choice ending with the
.confextension:Note
You can create multiple WireGuard VPN tunnels on the same machine, each using a different configuration file, network address, and UDP port.
sudo touch /etc/wireguard/wg0.confGenerate a new private and public key pair for the WireGuard server:
wg genkey | sudo tee /etc/wireguard/wg0 | wg pubkey | sudo tee /etc/wireguard/wg0.pubEdit the configuration file with your editor of choice.
sudo vi /etc/wireguard/wg0.confPaste the following:
[Interface]
PrivateKey = server_privatekey
Address = x.x.x.x/24
ListenPort = 51820
You must replace the
server_privatekeywith the private key generated earlier. You can view the private key with:sudo cat /etc/wireguard/wg0Next, you will need to replace
x.x.x.x/24with a network address within the private IP address range defined by RFC 1918. The network address used in this guide is10.255.255.0/24.Finally, you can choose any UDP port to accept connections with WireGuard VPN. UDP port
51820is used for the purposes of this guide.Enable IP forwarding
IP forwarding allows the routing of packets between networks. This allows internal devices to communicate with each other through the WireGuard tunnel:
Turn on IP forwarding for IPv4 and IPv6:
sudo sysctl -w net.ipv4.ip_forward=1 && sudo sysctl -w net.ipv6.conf.all.forwarding=1Configure
firewalldInstall
firewalld:sudo dnf install firewalld -yAfter installing
firewalld, enable it:sudo systemctl enable --now firewalldCreate a permanent firewall rule allowing traffic on UDP port 51820 in the public zone:
sudo firewall-cmd --permanent --zone=public --add-port=51820/udpNext, traffic from the WireGuard interface will be allowed to other interfaces in the internal zone.
sudo firewall-cmd --permanent --add-interface=wg0 --zone=internalAdd a firewall rule to enable IP masquerading on internal traffic. This means that packets sent between peers will replace the packet IP address with the server’s IP address:
sudo firewall-cmd --permanent --zone=internal --add-masqueradeFinally, reload
firewalld:sudo firewall-cmd --reloadConfigure WireGuard peer
Since all computers in a WireGuard network are technically peers, this process is nearly identical to configuring the WireGuard server, but with slight differences.
Create a folder to put your WireGuard configuration files and keys:
sudo mkdir -p /etc/wireguardCreate a configuration file, giving it a name of your choice, ending with the
.confextension:sudo touch /etc/wireguard/wg0.confGenerate a new private and public key pair:
wg genkey | sudo tee /etc/wireguard/wg0 | wg pubkey | sudo tee /etc/wireguard/wg0.pubEdit the configuration file with your editor of choice, adding this content:
[Interface]
PrivateKey = peer_privatekey
Address = 10.255.255.2/24

[Peer]
PublicKey = server_publickey
AllowedIPs = 10.255.255.1/24
Endpoint = serverip:51820
PersistentKeepalive = 25
Replace
peer_privatekeywith the peer’s private key stored in/etc/wireguard/wg0on the peer.You can use this command to output the key so you can copy it:
sudo cat /etc/wireguard/wg0Replace
server_publickeywith the server’s public key stored in/etc/wireguard/wg0.pubon the server.You can use this command to output the key so you can copy it:
sudo cat /etc/wireguard/wg0.pubReplace
serveripwith the public IP of the WireGuard server.You can find the server’s public IP address using the following command on the server:
ip a | grep inetThe peer’s configuration file now includes a
PersistentKeepalive = 25rule. This rule tells the peer to ping the WireGuard server every 25 seconds to maintain the VPN tunnel’s connection. Without this setting, the VPN tunnel will time out after inactivity.Enable WireGuard VPN
To enable WireGuard, you will run the following command on both the server and peer:
sudo systemctl enable wg-quick@wg0Then start the VPN by running this command on both the server and peer:
sudo systemctl start wg-quick@wg0Add the client key to the WireGuard server configuration
Output the peer’s public key and copy it:
sudo cat /etc/wireguard/wg0.pubOn the server, run the following command, replacing
peer_publickeywith the peer’s public key:sudo wg set wg0 peer peer_publickey allowed-ips 10.255.255.2Using
wg setonly makes temporary changes to the WireGuard interface. For permanent configuration changes you can manually edit the configuration file and add the peer. You will need to reload the WireGuard interface after making any permanent configuration changes.Edit the server’s configuration file with your editor of choice.
sudo vi /etc/wireguard/wg0.confAdd the peer to configuration file. The contents should look similar to below:
[Interface]
PrivateKey = +Eo5oVjt+d3XWvFWYcOChaLroGj5vapdXKH8UZ2T2Fc=
Address = 10.255.255.1/24
ListenPort = 51820

[Peer]
PublicKey = 1vSho8NvECkG1PVVk7avZWDmrd2VGZ2xTPaNe5+XKSg=
AllowedIps = 10.255.255.2/32
Bring interface down:
sudo wg-quick down wg0Bring interface up:
sudo wg-quick up wg0View WireGuard interfaces and test connectivity
You can view WireGuard information on both the server and peer with:
sudo wgYou can test connectivity by sending a ping to the server from the peer:
ping 10.255.255.1Conclusion
Following this guide, you have successfully set up a WireGuard VPN using the hub-spoke model. This configuration provides a secure, modern, and efficient way to connect multiple devices across the internet. Check the official WireGuard website.
Articles to Read Next
How to Setup WireGuard VPN on Rocky 9 Linux
Secure Remote Support on LAN with x11vnc over SSH on Rocky Linux
How to Install Virtual Box and Answering “What is a Hypervisor?”
How to Enable Bidirectional Shared Clipboard on VirtualBox VM
How to Create a Linux VM with VirtualBox
Affiliate Links
Form your business with Northwest registered agent
Create a website with namedotcom
Secure your website with Wordfence
Affiliate Disclaimer
Please note that my website and content may contain affiliate links. This means that when you click on these links and make a purchase, I may earn a commission. Rest assured, all the products I promote are ones that I believe to be of high quality, and I personally use them as a consumer myself. Your support through these links helps me continue to create valuable content. Thank you for your support!
- The ability to run commands as the root user or use